2019独角兽企业重金招聘Python工程师标准>>> 
最初安装 gentoo 的时候,选择的日志记录工具是 syslog-ng(官方手册推荐的嘛)。一直零配置使用到现在。最近整理了一下日志,配合 cron logrotate 和 logwatch,对日志的记录进行了一下整理,方便查看。
- syslog-ng 配置
首先解 释两个概念 : l eve l(severity)和 facility。
| 序号 | 严重性 | 描述 |
|---|---|---|
| 0 | debug | 调试 |
| 1 | info | 一般讯息 |
| 2 | notice | 注意 |
| 3 | warning | 警告 |
| 4 | error | 错误 |
| 5 | crit | 严重错误 |
| 6 | alert | 必须采取一些措施 |
| 7 | emerg | 系统不能使用 |
| 序号 | Facility | 描述 |
|---|---|---|
| 0 | kern | 内核产生的讯息 |
| 1 | user | 用户等级讯息 |
| 2 | 邮件系统产生的讯息 | |
| 3 | daemon | 系统服务产生的讯息 |
| 4 | auth | 安全和认证等讯息 |
| 5 | syslog | msyslogd |
| 6 | lpr | 打印机讯息 |
| 7 | news | 网络新闻组子系统 |
| 8 | uucp | UUCP 子系统 |
| 9 | cron | cron例程讯息 |
| 10 | security | 安全和认证讯息 |
| 11 | ftp | FTP 服务 |
| 12 | ntp | NTP 子系统 |
| 13 | logaudit | log audit |
| 14 | logalert | log alert |
| 15 | clock | 时钟服务 |
| 16 | local0 | local use 0 (local0) |
| 17 | local1 | local use 1 (local1) |
| 18 | local2 | local use 2 (local2) |
| 19 | local3 | local use 3 (local3) |
| 20 | local4 | local use 4 (local4) |
| 21 | local5 | local use 5 (local5) |
| 22 | local6 | local use 6 (local6) |
| 23 | local7 | local use 7 (local7) |
options(全局配置){
chain_hostnames(yes|no) # 是否打开主机名链功能,打开后可在多网络段转发日志时有效
long_hostnames(yes|no) # 是否使用chain_hostnames的别名,已不建议使用
keep_hostname(yes|no) # 是否保留日志消息中保存的主机名称
use_dns(yes|no) # 是否打开DNS查询功能,
use_fqdn(yes|no) # 是否使用完整的域名
check_hostname(yes|no) # 是否检查主机名有没有包含不合法的字符
bad_hostname(regexp) # 可通过正规表达式指定某主机的信息不被接受
dns_cache(yes|no) # 是否打开DNS缓存功能
dns_cache_expire(n) # DNS缓存功能打开时,一个成功缓存的过期时间dns_cache_expire_failed(n) # DNS缓存功能打开时,一个失败缓存的过期时间
dns_cache_size(n) # DNS缓存保留的主机名数量
create_dirs(yes|no) # 当指定的目标目录不存在时,是否创建该目录
dir_owner(uid) # 目录的UID
dir_group(gid) # 目录的GID
dir_perm(perm) # 目录的权限
owner(uid) # 文件的UID
group(gid) # 文件的GID
perm(perm) # 文件的权限
gc_busy_threshold(n) # 当syslog-ng忙时,其进入垃圾信息收集状态的时间一旦分派的对象达到这个数字,syslog-ng就启动垃圾信息收集状态。默认值是:3000
gc_idle_threshold(n) # 当syslog-ng空闲时,其进入垃圾信息收集状态的时间一旦被分派的对象到达这个数字,syslog-ng就会启动垃圾信息收集状态,默认值是:100
log_fifo_size(n) # 输出队列的行数
log_msg_size(n) # 消息日志的最大值(bytes)
mark(n) # 多少时间(秒)写入两行MARK信息供参考,目前没有实现
stats(n) # 多少时间(秒)写入两行STATUS信息,默认值是:600
sync(n) # 缓存多少行的信息再写入文件中,0为不缓存,局部参数可以覆盖该值。
time_reap(n) # 在没有消息前,到达多少秒,即关闭该文件的连接
time_reopen(n) # 对于死连接,到达多少秒,会重新连接
use_time_recvd(yes|no) # 宏产生的时间是使用接受到的时间,还是日志中记录的时间;建议使用R_的宏代替接收时间,S_的宏代替日志记录的时间,而不要依靠该值定义。
}
source(日志源){
internal() #syslog-ng内部产生的消息
file() #从指定文件读取日志信息
pipe() #从指定的管道,读取日志信息
fifo() #从指定的FIFO设备,读取日志信息
program() # 打开指定的应用程序,从它的标准输出读取消息
sun-stream(), sun-streams() # 在solaris系统中,打开一个(多个)指定的STREAM设备,从其中读取日志消息
system()#从系统读取信息
tcp(), tcp6() # 在指定的TCP端口接收日志消息
udp(), udp6() # 在指定的UDP端口接收日志消息
unix-dgram() # 打开指定的SOCK_DGRAM模式的unix套接字,接收日志消息
destination(日志目的地){
file() # 把日志消息写入指定的文件
pipe() # 把日志消息发送到指定的管道
fifo() # 把日志消息发送到指定的FIFO设备
program() # 启动指定的程序,并把日志消息发送到该进程的标准输入
sql() # 把日志消息写入数据库,适用于3.x版本及更高版本的syslog-ng
tcp() and tcp6() # 把日志消息发送到指定的TCP端口
udp() and udp6() # 把日志消息发送到指定的UDP端口
unix-dgram() # 把日志消息写入指定的SOCK_DGRAM模式的unix套接字
unix-stream() # 把日志消息写入指定的SOCK_STREAM模式的unix套接字
usertty() # 把日志消息发送到已经登陆的指定用户终端窗口
}
filtier(过滤器){
facility() # 根据facility(设备)选择日志消息
filter() # 调用另一条过滤规则
host() # 日志消息的主机名是否和一个正则表达式匹配
level() or priority() # 根据level(优先级)选择日志消息
match() # 对日志消息的内容进行正则匹配
message()#使用正则表达式过滤信息
netmask()#基于 IP 地址过滤信息
program()#基于发送程序过滤信息
}
log(日志规则)
{source S1; source S2; ...filter F1; filter F2; ... destination D1; destination D2; ...}
单机配置实例
options {chain_hostnames(no); # The default action of syslog-ng is to log a STATS line# to the file every 10 minutes.  That's pretty ugly after a while.# Change it to every 12 hours so you get a nice daily update of# how many messages syslog-ng missed (0). stats_freq(43200);
};source src {unix-stream("/dev/log" max-connections(256));internal();
};source kernsrc { file("/proc/kmsg"); }; # define destinations destination authlog { file("/var/log/auth.log"); };
destination syslog { file("/var/log/syslog"); };
destination cron { file("/var/log/cron.log"); };
destination daemon { file("/var/log/daemon.log"); };
destination kern { file("/var/log/kern.log"); };
destination lpr { file("/var/log/lpr.log"); };
destination user { file("/var/log/user.log"); };
destination mail { file("/var/log/mail.log"); };destination mailinfo { file("/var/log/mail.info"); };
destination mailwarn { file("/var/log/mail.warn"); };
destination mailerr { file("/var/log/mail.err"); };destination newscrit { file("/var/log/news/news.crit"); };
destination newserr { file("/var/log/news/news.err"); };
destination newsnotice { file("/var/log/news/news.notice"); };destination debug { file("/var/log/debug"); };
destination messages { file("/var/log/messages"); };
destination console { usertty("root"); }; # By default messages are logged to tty12... destination console_all { file("/dev/tty12"); }; # ...if you intend to use /dev/console for programs like xconsole
# you can comment out the destination line above that references /dev/tty12
# and uncomment the line below. #destination console_all { file("/dev/console"); }; # create filters filter f_authpriv { facility(auth, authpriv); };
filter f_syslog { not facility(authpriv, mail); };
filter f_cron { facility(cron); };
filter f_daemon { facility(daemon); };
filter f_kern { facility(kern); };
filter f_lpr { facility(lpr); };
filter f_mail { facility(mail); };
filter f_user { facility(user); };
filter f_debug { not facility(auth, authpriv, news, mail); };
filter f_messages { level(info..warn)and not facility(auth, authpriv, mail, news); };
filter f_emergency { level(emerg); };filter f_info { level(info); };
filter f_notice { level(notice); };
filter f_warn { level(warn); };
filter f_crit { level(crit); };
filter f_err { level(err); };
filter f_failed { message("failed"); };
filter f_denied { message("denied"); }; # connect filter and destination log { source(src); filter(f_authpriv); destination(authlog); };
log { source(src); filter(f_syslog); destination(syslog); };
log { source(src); filter(f_cron); destination(cron); };
log { source(src); filter(f_daemon); destination(daemon); };
log { source(kernsrc); filter(f_kern); destination(kern); };
log { source(src); filter(f_lpr); destination(lpr); };
log { source(src); filter(f_mail); destination(mail); };
log { source(src); filter(f_user); destination(user); };
log { source(src); filter(f_mail); filter(f_info); destination(mailinfo); };
log { source(src); filter(f_mail); filter(f_warn); destination(mailwarn); };
log { source(src); filter(f_mail); filter(f_err); destination(mailerr); };log { source(src); filter(f_debug); destination(debug); };
log { source(src); filter(f_messages); destination(messages); };
log { source(src); filter(f_emergency); destination(console); }; # default log log { source(src); destination(console_all); };
- cron配置
在gentoo 下我使用的是 vixie-cron,并配合使用了anacron。emerge 已经包含了这两个软件的安装包。cron分为系统工作和用户工作两种。用户的工作用 crontab 指令下达,内容保存在 /var/spool/cron/$user;系统工作直接编辑/etc/crontab文件进行设定。
执行权限
/etc/cron.allow
将可以使用crontab的用户名写入其中
/etc/cron.deny
将不可以使用crontab的用户名写入其中
两个文件都存在的情况下,/etc/cron.allow的优先权比/etc/cron.deny高。系统默认保留/etc/cron.deny,把限制使用crontab的用户写入其中,其他用户默认都可以使用crontab。
用户工作
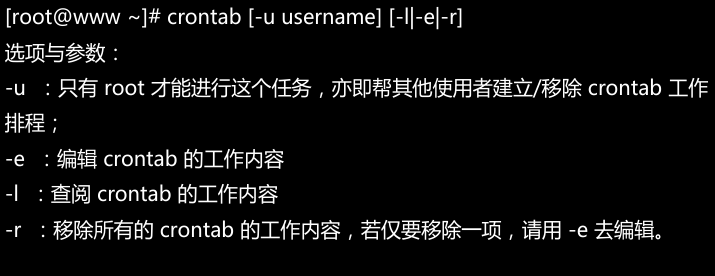
下达编辑指令后,会出现 vi 的编辑界面。每一行代表一个工作,一个工作分为六个字段

P.S. 0 和 7 都代表星期日
特殊字符的含义

系统工作
系统工作要直接编辑/etc/crontab文件
我的crontab文件设定如下

SHELL:shell类型
PATH:执行文件的默认路径
MAILTO:发生错误时发送邮件
HOME:默认此shell的家目录
crontab 默认定义五项任务:每小时,每天,每周,每个月清除执行过的文件缓存;每十分钟侦测一遍 /etc/cron.[hourly | daily | weekly | monthly] 的执行。
最后两个任务是我自行定制的:
00 20 * * * root run-parts /etc/cron.daily #每天晚上8点运行/etc/cron.daily目录内的脚本
00 20 * * 0 root run-parts /etc/cron.weekly #每周日晚上8点运行/etc/cron.weekly目录内的脚本
P.S.run-parts 是/bin目录下的一个可执行脚本,它执行指定目录内的所有脚本(man run-parts)
- anacron配置
anacron存在的目的是为了弥补不能够24小时开机的服务器的cron的不足。以我的设置为例,我设定每周日运行/etc/cron.weekly目录下的档案,如果我有一周周日刚好去约会了(虽然不太可能),没有开电脑,那么就要等下一周的周日再继续执行。这势必会延误一些日程的安排。基于此,anacron出现了。anacron会以用户设定的时间频率去侦测系统未进行的cron任务并将它执行。
anacron的配置很简单,配置文件在/etc/anacrontab。我的anacron配置如下

anacron的每项任务由4个字段组成:天数,延迟时间,工作名称,执行的指令。
以上两项任务的意思是:每天开机5分钟后执行/etc/cron.daily目录内的脚本;每周开机10分钟后运行/etc/cron.weekly目录内的脚本。
P.S.anacron在执行前,会比对对应目录内,脚本最近一次执行的时间戳,若差异不足一天,则不执行脚本。
- logrotate配置
logrotate被设计用来整理归档日志文件。想象一下,如果配置好 syslog-ng 后,就再也不对日志进行管理,那么/var/log目录下的日志文件将会越来越大,变得难以读取和分析。基于此,产生了logrotate。logrotate 的主要功能是将旧的日志备份,并产生新的日志文件继续记录,到达用户规定的备份数量之后,就将其删除。它的原理可以用下图描述

配置文件包括/etc/logrotate.conf和/etc/logrotate.d/。前者是针对整体设定,后者是针对具体 daemon 设定。
/etc/logrotate.conf
#每周备份
weekly
#保留四个文件
rotate 4
#每次建立新的日志记录档案
create
#是否启用压缩
#compress#将 logrotate.d 目录内的档案读取进来进行 rotate
include /etc/logrotate.d#仅针对 wtmp 的设定
/var/log/wtmp{monthlysize 1Mcreate 0664 root utmprotate 1
}基于 syslog-ng 设定的logrotate:/etc/logrotate.d/syslog-ng
在 syslog-ng 的配置文件中,我设定了16个日志记录档案,所以,syslog-ng 的 logrotate 要针对这 16 个档案,如下

这样,就可以利用 logrotate 进行日志档案的备份工作了。logrotate 默认是利用 cron 来进行工作的,在 /etc/cron.weekly 目录下,有一个名为 logrotate 的脚本,内容是

所以,在每周执行 cron 的时候,都会运行 logrotate 脚本,它读取 logrotate.conf 对日志进行备份。
- logwatch配置
logwatch 是一个日志分析工具,它根据用户设定的频率来分析日志并给指定用户发送邮件。同样,可以使用 emerge 安装。安装完成后,默认的配置文件在 /usr/share/logwatch/default.conf/logwatch.conf。用户自定义的配置文件在 /etc/logwatch/。将 /usr/share/logwatch/default.conf/logwatch.conf 复制到 /etc/logwatch/,并稍加修改即可使用。一些典型配置选项如下LogDir = /var/log #logwatch 会去 /var/log 找你定义的 log 文件 TmpDir = /var/cache/logwatch #缓存目录 Output = mail #输出形式为 mail MailTo = root #发送给 root MailFrom = Logwatch #邮件发送者 Range = yesterday #处理什么时候的日志 , 可选项 All , Yesterday , Today Detail = High #日志详细度, 可选项 Low , Med , High , 或是 0-10数字 Print = No #可选项, Yes 会被打印到系统标准输出, 并且不会以邮件的形式发送到 MailTo 设定的邮箱里 , No 选项则会发到邮箱中 Server = All #监控所有服务 all mailer = "/usr/sbin/sendmail -t" #发送邮件的服务
logwatch 也是用 cron 来执行的,在 /etc/cron.daily 目录下,有 logwatch 执行脚本。
整个流程可以这样解释:
syslog-ng 负责记录日志,logrotate 通过 cron 和 anacron 进行日志的整理,logwatch 通过 cron 和 anacron 进行日志分析并发送给 root。